The Parkmaker's Guide:
From Ground Up
Ok, you've read all my issues on architecture. You know about roofing, wall decoration, and balconies. You may even know all three issues inside, out, and backwards. But how do they relate to each other? How do you incorporate all of those aspects into a building? How do you even build a building?
This tutorial demonstrates the basic method of shaping and sculpting your buildings to make them look balanced and interesting. It combines the many different features of architecture and shows you how to manipulate them into creating your own piece of work. Pay attention, because this is the most important information you need to know before you move on to creating the many different types of architecture available in RCT2.
So, how do you start? Well, it's simple! Just read the title - From Ground Up. That's right, you start from the ground (Duh!). This means that you must begin with a base. The base is the foundation for your building. Without it, your structure would have no shape or even existence, which is somewhat important.
The shape of the base is the determining factor of how your building is going to look. Will you want something symmetrical? Or perhaps square? Rectangular? A good tip to creating a base is to figure out what kind of building you're looking for. If it's an entrance, symmetry is often used but not always. If you have an oddly-shaped space left to build something, an oddly-shaped base might be the way to go.
Another method is to put together shapes in your mind. For instance, my base could look like a rectangle sticking into a circle. Or it could be two hexagons side by side. Whatever it is, try to copy it and see how it looks as a base. I made a base that looked like a rectangle sticking into the side of another rectangle. Using wall decorations (Issue #4), I came to this point:
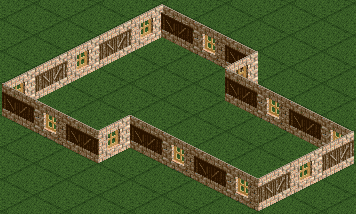
Now, the next key is to analyze your base. I showed you something similar in the roofing tutorial with a symmetrical base. This time, I noticed that there are two different sections I can work with: one rectangle and the other rectangle. The breaks in the walls help me determine my options. I could place a balcony on one of the rectangles and a second story on the other one. Or, vise versa. After contemplating, I determined that I wanted to put a low roof on the right rectangle, two balconies on both sides of the left rectangle, and a balcony in the middle of the left. Confusing? Well, you'll soon see what I mean.
After you have your game plan, the next step is to add your dividers. As mentioned in previous issues, dividers are key to leveling out the different stories and balconies so that it stacks up evenly. These aren't necessary, but recommended for beginners. I added a small piece of wooden wall all around my base to act as a divider. also, where the balconies are, I added wooden blocks to make a balcony floor. See below.
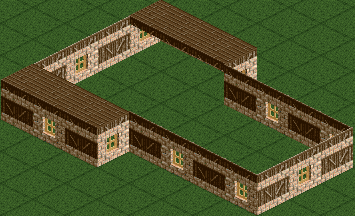
Alright, now for the second story. But first, I planned to add low roofing to the right rectangle. I'd better focus on the right rectangle before moving on to the left. Using the different roofing options (See Issue #3), I added tile roofing with the same color as the brick windows to match. I sunk the roof at the same level as the dividers for more interest. This is always optional, but be sure to consider what you want and don't want with your roofing. I finished the middle portion with flat wooden roofing.
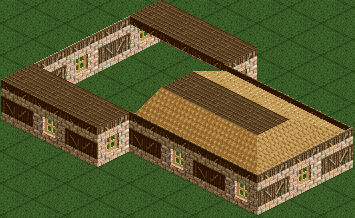
Phew, that was hard work! Well, not really. But nevertheless, it's time to move on to the remaining section, and the second story. I began by adding another set of full walls around the unoccupied perimeter of the rectangle. To tie in the look, I used the same pattern as the first story with the same textures and colors. I raised two brick walls for extra interest and finished the balconies with wooden post fences.
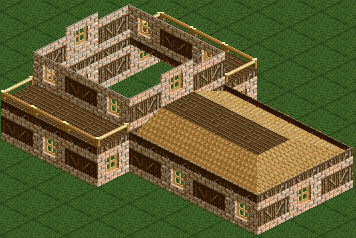
The rest was a stroll in the park! Some finishing touches, roofing, details, and I'm finished with my splendid piece of architecture. What do you think?
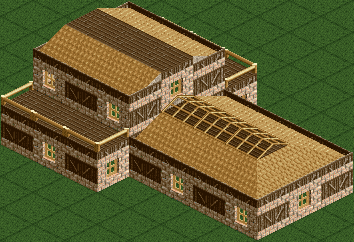
Yeah, ok, so maybe it's not that great, but considering the small amount of time it took, I created a masterpiece (*cough* ego *cough*). But now how do you tie it into the rest of the park? I mean, it's simple when you create a building in the middle of nowhere, but what if I need to have pathing close to it? That's easy! Using different gap-filling techniques, I added flowers and a path to show you how you could suck some function from this new building.
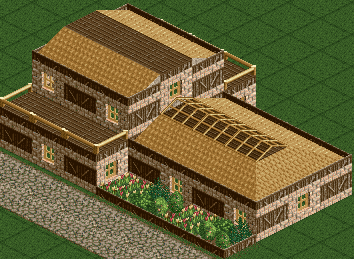
Wasn't that easy? Now that you've mastered the basics on creating a building, you can move on to plenty of different types of architecture. Bridges, entrances, sculptures, it's all the same once you realize how similar it is to the method I showed you in this tutorial. Good luck with your architecture and as always, don't be afraid to experiment!
Copyright © Steve Welch